
Deploy AWS Elastic Beanstalk App With HTTP Basic Auth and Self-Signed SSL Certificate
 Sarah Cassady
| 18 Sep 2016 | Tags: ruby, puma, nginx, openssl, aws eb, aws s3
Sarah Cassady
| 18 Sep 2016 | Tags: ruby, puma, nginx, openssl, aws eb, aws s3
One of the major benefits of deploying on AWS Elastic Beanstalk [AWS EB] is that you set an instance type for your app and forget about it. If the instance crashes and gets rebuilt, everything continues business as usual. The AWS EB CLI does allow SSH access into app instances, but it should never be used for anything but looking. When an instance is rebuilt, it reverts back to the clean-slate AMI that was provisioned when the instance type was originally selected to create the environment; any changes made directly on the server via SSH are long gone. The impact of this is perhaps even more apparent in multi-instance, load-balanced environments where the configuration of each instance in the cluster must be consistent.
The solution is to pack up all custom server configurations with your application deployment, so when the app is deployed or an instance has to rebuild, those instructions can be executed before unpacking the app.
AWS EB provides an option to add an .ebextensions folder at the app root, inside which *.config files will execute in order.
The extension script solution applies to both single- and multi-instance environments but for the purposes of a staging environment, small to mid size apps can typically be deployed to a single, lower-resource environment where loads will be limited to the number of users testing it. Note, however, when running a multi-instance staging environment a self-signed certificate may still be used, but you should instead assign the certificate to the load balancer (for more info, see Configuring HTTPS for your Elastic Beanstalk Environment).
The following sections describe how to use this strategy in order to deploy an app to a single-instance staging environment with HTTP Basic Auth and HTTPS using a self-signed SSL certificate. This is not recommended for production deployments.
HTTP Basic Auth
AWS EB extension scripts run in all environments. All of them. If a script is there, it will run.
But by the time these scripts are executed, the app’s environment variables will be available so conditions on RACK_ENV can be invoked in shell scripts.
Generate Credentials
HTTP Basic Auth tests user credentials against an .htpasswd file so we need to generate the encrypted user credentials which will then be included in the script.
From the command line in an environment running Apache, generate the user credentials string:
$ htpasswd -nb username password
username:$apr1$k5WkOMBL$0FZNIWOLQMsHJAOREjemC/
Create The Script
The script does the following things:
- Creates the
.htpasswdfile (replace the file’s content with your own generated credentials string) - Creates a
staging.conffile which will be automatically loaded in with the default conf when present - Creates an
nginx_auth.shfile containing a script to add HTTP Basic Auth to the staging environment - Executes the
nginx_auth.shfile then restarts nginx
# .ebextensions/01-http_basic_auth_staging.config

files:
  /etc/nginx/.htpasswd:
    mode: "000755"
    owner: root
    group: root
    content: |
      username:$apr1$k5WkOMBL$0FZNIWOLQMsHJAOREjemC/

  /etc/nginx/conf.d/staging.conf:
    mode: "000755"
    owner: root
    group: root
    content: |
      server {
        listen       80;
        server_name  localhost;
        location / {
          proxy_pass        http://my_app;
          proxy_set_header  Host $host;
          proxy_set_header  X-Forwarded-For $proxy_add_x_forwarded_for;
        }
      }

  /tmp/deployment/nginx_auth.sh:
    mode: "000755"
    content: |
      if [ "$RACK_ENV" == "staging" ]; then
        sed -i 's/$proxy_add_x_forwarded_for;/$proxy_add_x_forwarded_for;\n   auth_basic "Restricted";\n    auth_basic_user_file \/etc\/nginx\/.htpasswd;\n/' /etc/nginx/conf.d/staging.conf
      fi

container_commands:
  01nginx_auth:
    command: "/tmp/deployment/nginx_auth.sh"
  02restart_nginx:
    command: "service nginx restart"
Self-Signed SSL Certificate
Unless you have already purchased a wildcard SSL certificate which you can use for free on a subdomain of your production domain, the cheapest (free) option to enable HTTPS on a staging instance is to create and sign and install one yourself.
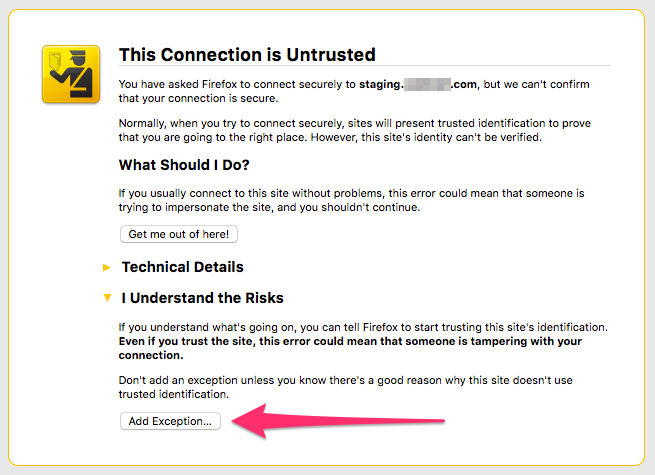
Note that unsigned certificates will normally flag an “Untrusted Connection” warning from the browser upon visiting.
Since you personally know and can verify that this connection is trusted, most browsers will allow an exception to be saved for a domain, suppressing further occurrences of the warning.
Ensure that all other users who will be accessing the staging instance are prepared to handle this warning also.
Create a Self-Signed SSL Certificate
From the command line in an environment with OpenSSL installed, generate and sign a x509 certificate.
Create the private key:
$ openssl genrsa 2048 > privatekey.pem
Generating RSA private key, 2048 bit long modulus
.............................+++
..+++
e is 65537 (0x10001)
Create the CSR:
$ openssl req -new -key privatekey.pem -out csr.pem
You are about to be asked to enter information that will be incorporated
into your certificate request.
What you are about to enter is what is called a Distinguished Name or a DN.
There are quite a few fields but you can leave some blank
For some fields there will be a default value,
If you enter '.', the field will be left blank.
-----
Country Name (2 letter code) [AU]:<your-country-code>
State or Province Name (full name) [Some-State]:<your-state-or-province-name>
Locality Name (eg, city) []:<your-locality-name>
Organization Name (eg, company) [Internet Widgits Pty Ltd]:<your-organization-name>
Organizational Unit Name (eg, section) []:<your-organizational-unit-name>
Common Name (e.g. server FQDN or YOUR name) []:<your-common-name>
Email Address []:<your-email-address>

Please enter the following 'extra' attributes
to be sent with your certificate request
A challenge password []:.
An optional company name []:.
Create the certificate:
$ openssl x509 -req -days 365 -in csr.pem -signkey privatekey.pem -out server.crt
Signature ok
subject=/C=<your-country-code>/ST=<your-state-or-province-name>/L=<your-locality-name>/O=e<your-organization-name>/OU=<your-organizational-unit-name>/CN=<your-common-name>/emailAddress=<your-email-address>
Getting Private key
Upload the SSL Certificate and Private Key
Open the AWS S3 Management Console and navigate to your default bucket: /elasticbeanstalk-us-west-2-<your-bucket-id>
Upload both the server.crt and privatekey.pem files generated above.
Create The Script
The script does the following things:
- Adds an authentication method named S3Auth to the environment’s Auto Scaling group’s metadata
- Configures a security group that opens port 443 to all traffic for a single instance environment
- Creates an
https.conffile containing a script to allow the instance to terminate HTTPS connections which will be automatically loaded in with the default conf when present - Creates
server.crtandserver.keyfiles to install the self-signed SSL certificate - Creates an
nginx_ssl.shfile containing a script to add HTTP Basic Auth to the secure staging environment (using the same.htpasswdfile and credentials created in the section above) - Executes the
nginx_ssl.shfile then restarts nginx
# .ebextensions/02-https_with_basic_auth_staging.config

Resources:
  AWSEBAutoScalingGroup:
    Metadata:
      AWS::CloudFormation::Authentication:
        S3Auth:
          type: "s3"
          buckets: ["elasticbeanstalk-us-west-2-<your-bucket-id>"]
          roleName:
            "Fn::GetOptionSetting":
              Namespace: "aws:asg:launchconfiguration"
              OptionName: "IamInstanceProfile"
              DefaultValue: "aws-elasticbeanstalk-ec2-role"

  sslSecurityGroupIngress:
    Type: AWS::EC2::SecurityGroupIngress
    Properties:
      GroupId: {"Fn::GetAtt" : ["AWSEBSecurityGroup", "GroupId"]}
      IpProtocol: tcp
      ToPort: 443
      FromPort: 443
      CidrIp: 0.0.0.0/0

files:
  /etc/nginx/conf.d/https.conf:
    mode: "000755"
    owner: root
    group: root
    content: |
      server {
          listen       443 ssl;
          listen       [::]:443 ssl;
          server_name  localhost;

          ssl                  on;
          ssl_certificate      /etc/pki/tls/certs/server.crt;
          ssl_certificate_key  /etc/pki/tls/certs/server.key;

          ssl_session_cache          shared:SSL:1m;
          ssl_session_timeout        10m;
          ssl_protocols              TLSv1 TLSv1.1 TLSv1.2;
          ssl_ciphers                HIGH:SEED:!aNULL:!eNULL:!EXPORT:!DES:!RC4:!MD5:!PSK:!RSAPSK:!aDH:!aECDH:!EDH-DSS-DES-CBC3-SHA:!KRB5-DES-CBC3-SHA:!SRP;
          ssl_prefer_server_ciphers  on;

          location / {
              proxy_pass           http://my_app;
              proxy_set_header     Host $host;
              proxy_set_header     X-Forwarded-For $proxy_add_x_forwarded_for;
              proxy_set_header     X-Forwarded-Proto https;
              proxy_redirect off;
          }
      }

  /etc/pki/tls/certs/server.crt:
    mode: "000400"
    owner: root
    group: root
    authentication: "S3Auth"
    source: https://s3-us-west-2.amazonaws.com/elasticbeanstalk-us-west-2-<your-bucket-id>/server.crt

  /etc/pki/tls/certs/server.key:
    mode: "000400"
    owner: root
    group: root
    authentication: "S3Auth"
    source: https://s3-us-west-2.amazonaws.com/elasticbeanstalk-us-west-2-<your-bucket-id>/privatekey.pem

  /tmp/deployment/nginx_ssl.sh:
    mode: "000755"
    content: |
      if [ "$RACK_ENV" == "staging" ]; then
        sed -i 's/$proxy_add_x_forwarded_for;/$proxy_add_x_forwarded_for;\n   auth_basic "Restricted";\n    auth_basic_user_file \/etc\/nginx\/.htpasswd;\n/' /etc/nginx/conf.d/https.conf
      fi

container_commands:
  01nginx_ssl:
    command: "/tmp/deployment/nginx_ssl.sh"
  02restart_nginx:
    command: "service nginx restart"