
Provisioning Developer Access For WordPress Deployments on AWS ElasticBeanstalk
 Sarah Cassady
| 22 May 2017 | Tags: wordpress, aws eb, aws codecommit, git
Sarah Cassady
| 22 May 2017 | Tags: wordpress, aws eb, aws codecommit, git
A client recently asked me to set up “some WordPress hosting” using their existing AWS services for a local web agency who would build them a new website. I created a vanilla WordPress deployment package for AWS Elastic Beanstalk with the W3 Total Cache plugin configured to use external asset resources including AWS S3, AWS CloudFront, AWS RDS, and AWS ElastiCache (a blog post for another day, but see this Amazon whitepaper for a starting reference), then popped the package into an AWS CodeCommit repository. To ensure that the agency developers can update the deployment package whenever new WordPress versions and patches are released, I configured access to AWS CodeCommit and AWS ElasticBeanstalk for each. Following is documentation for non-developer clients to provide new user access and AWS-virgin developers to set up their deployment workflow.
Non-Developer Client: Creating New Users
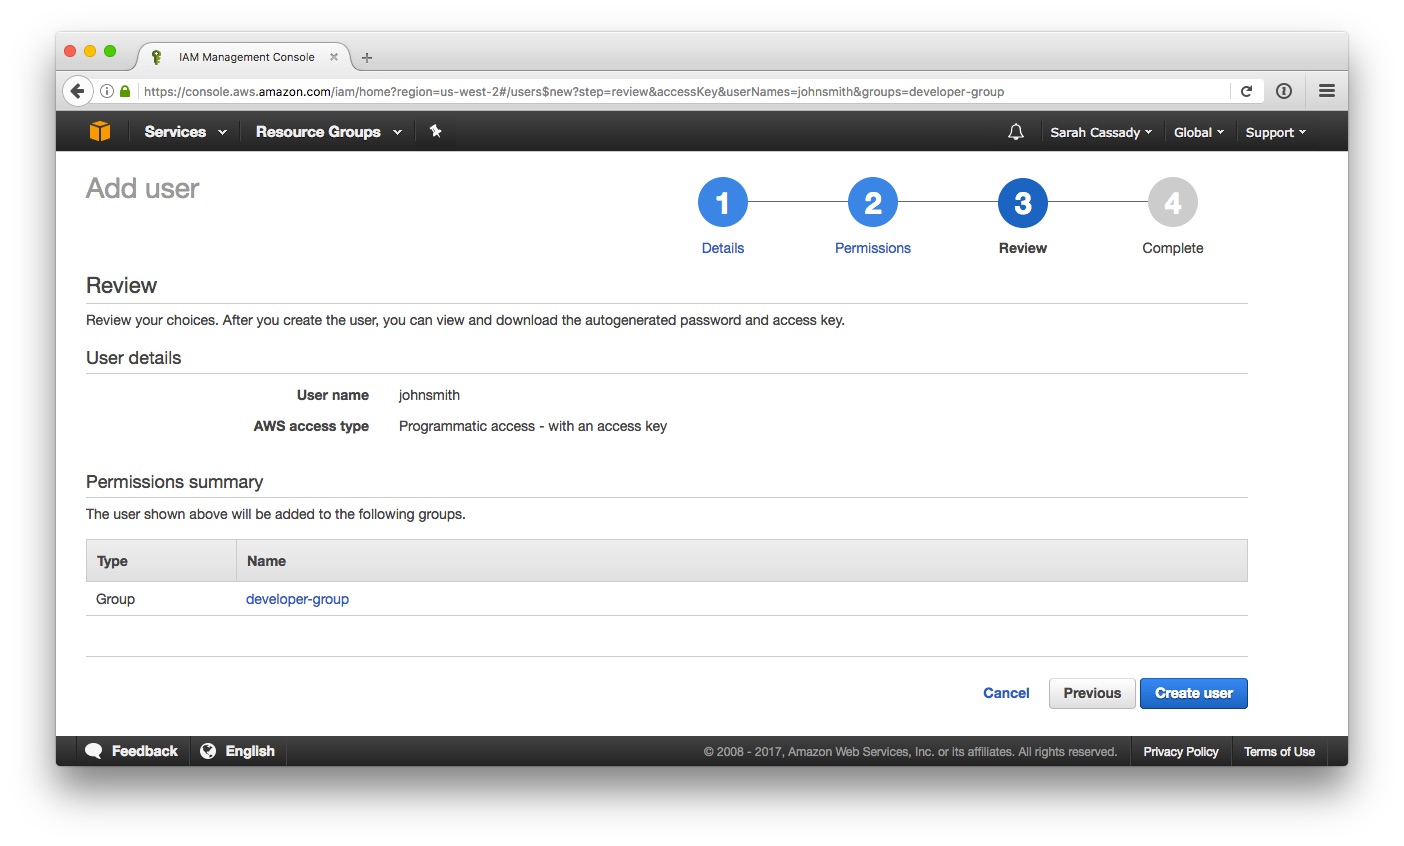
1) Add a new user via the the AWS IAM Console.
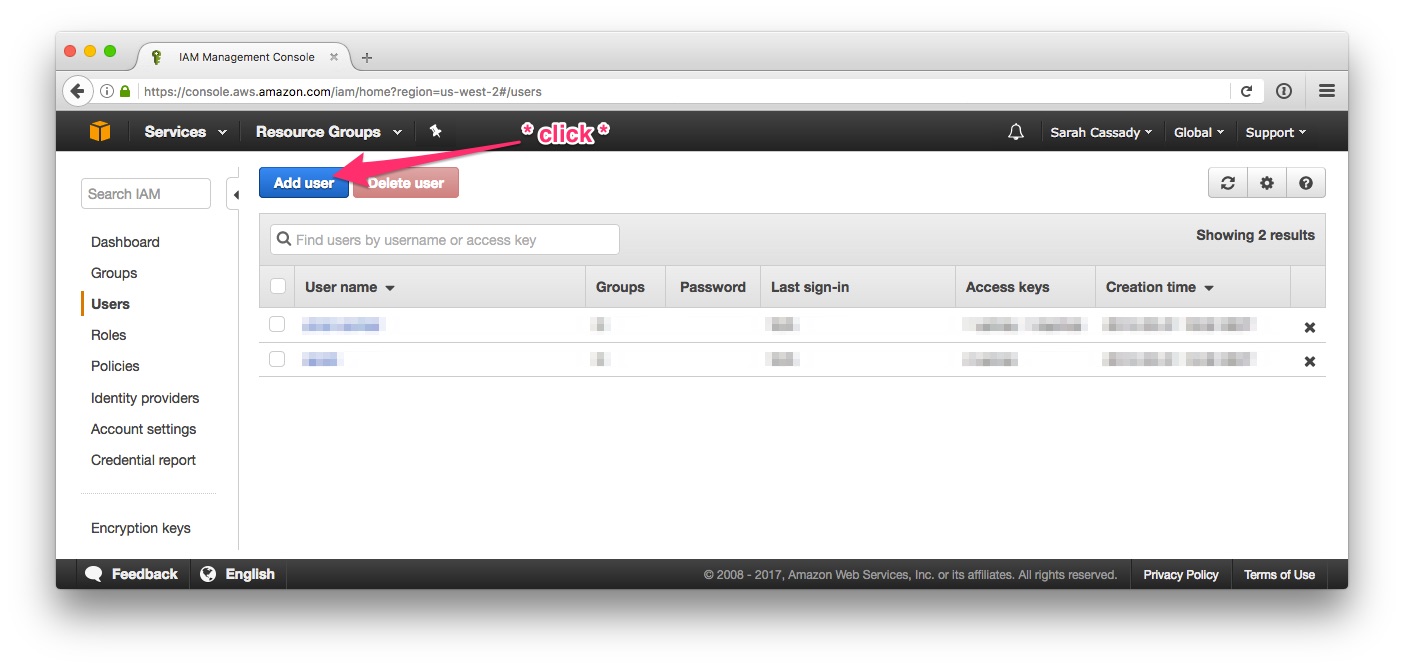
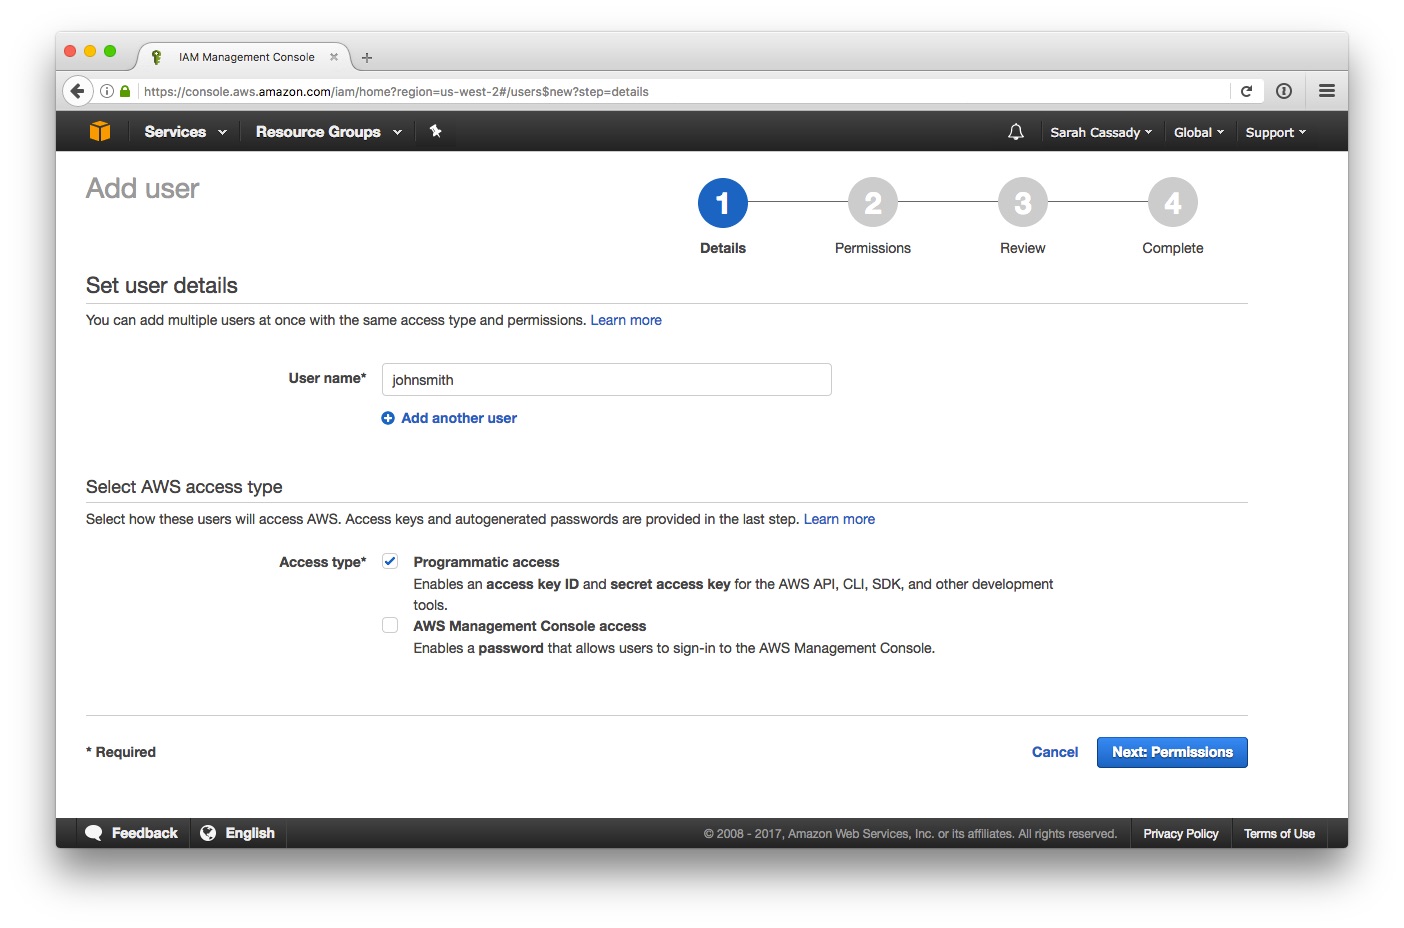
2) The user’s user name should be a concatenation of their first and last names. The AWS administrator may specify a different convention. Select “Programmatic access” only as the user’s access type.
3) Add the user to the developer-group, or whatever the appropriate group has been named by the AWS administrator.
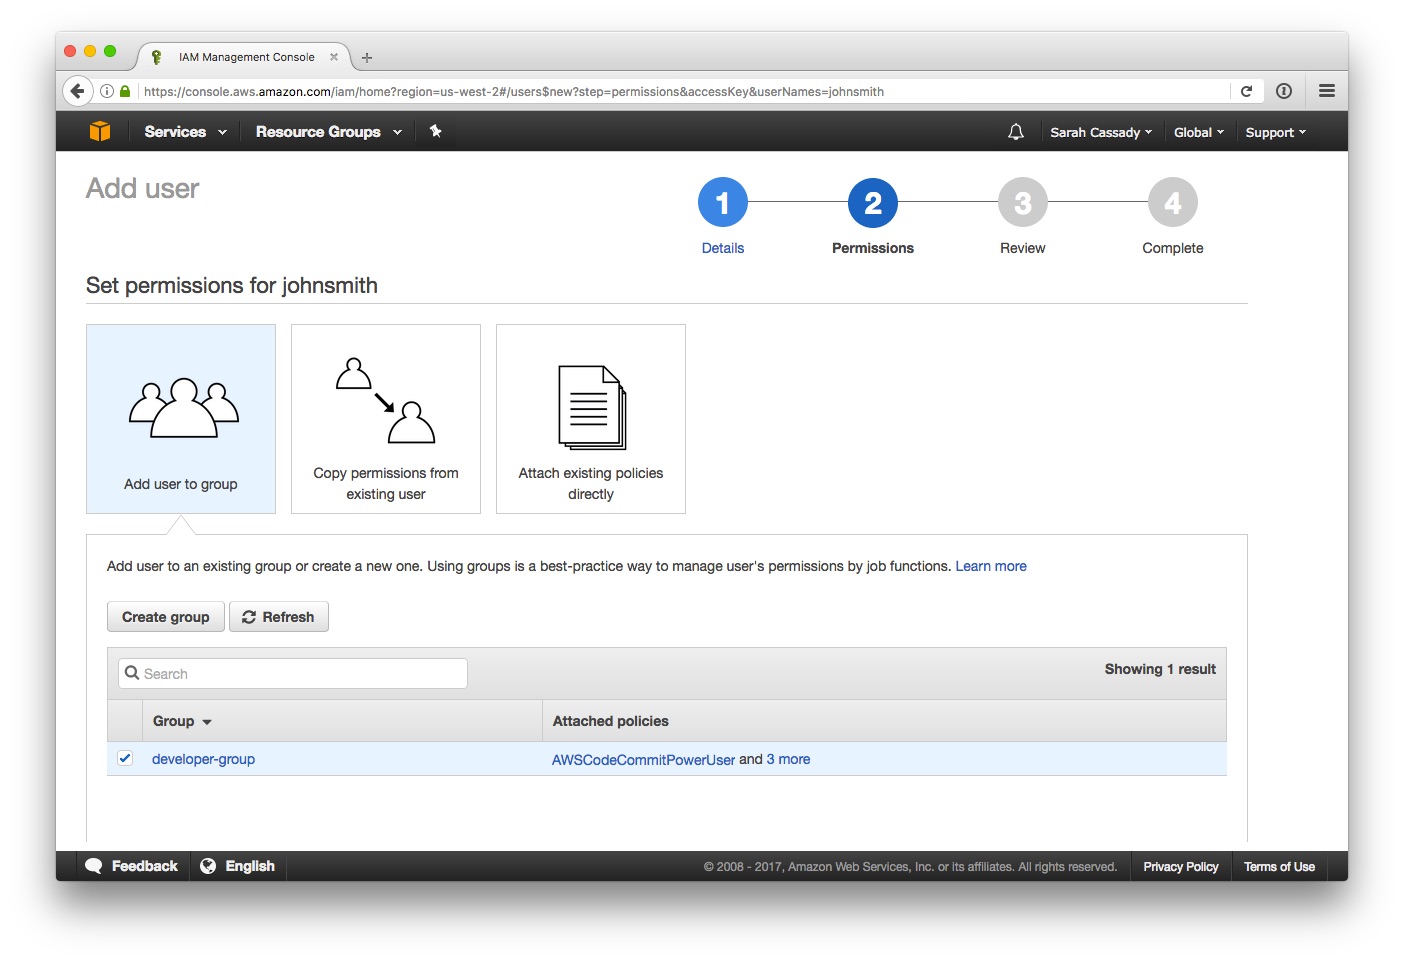
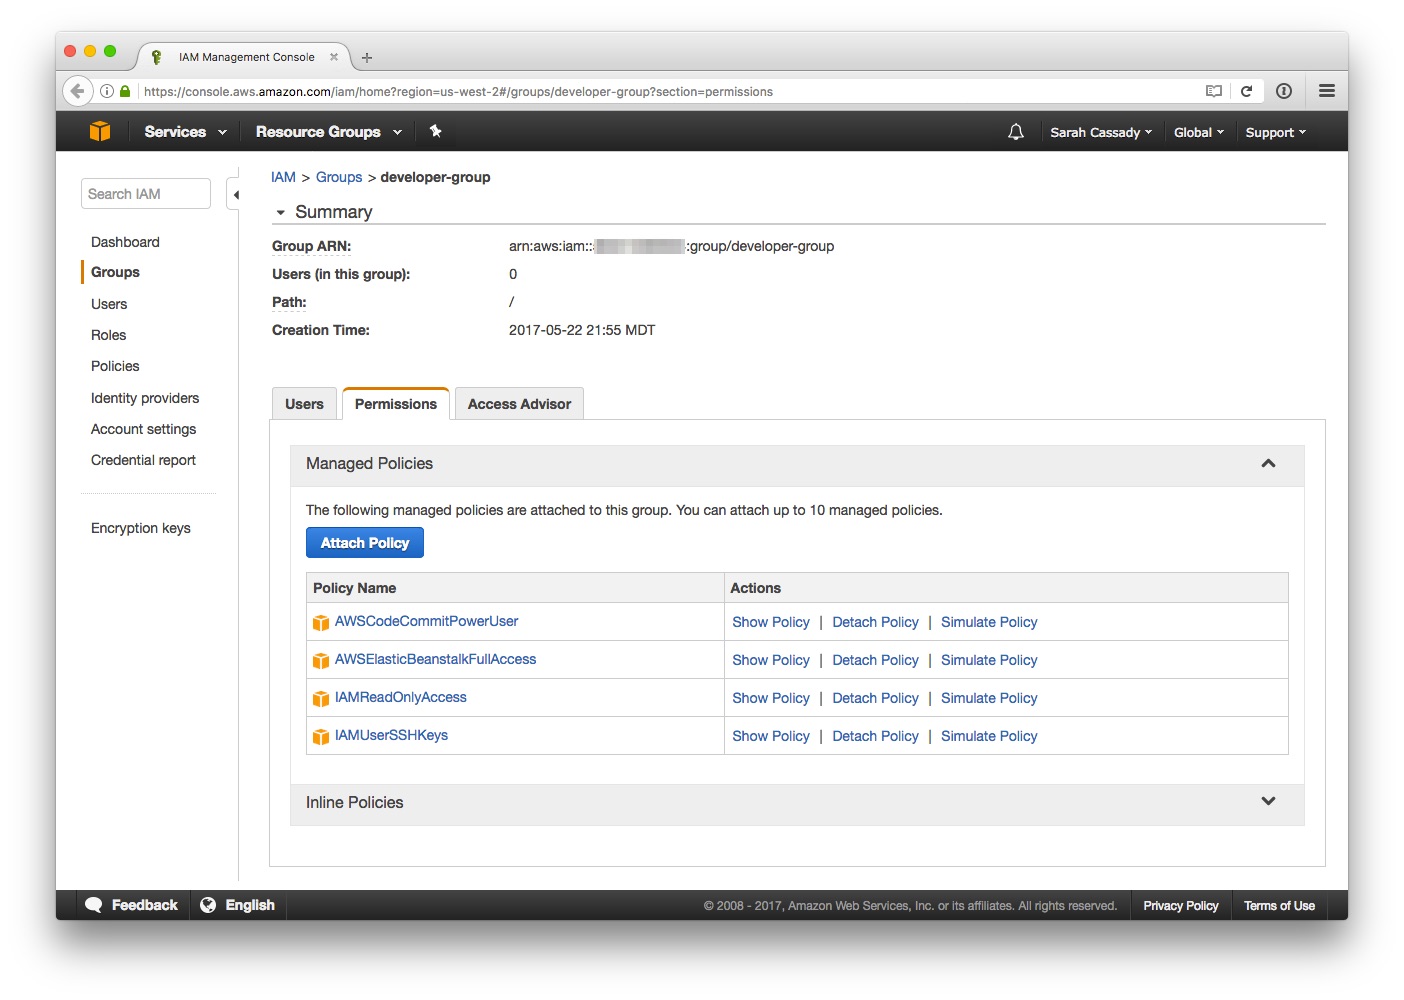
The example developer-group IAM group is made up of four IAM managed policies.
4) Review and create the user.
5) Download the new user’s credentials using the Download .csv button.
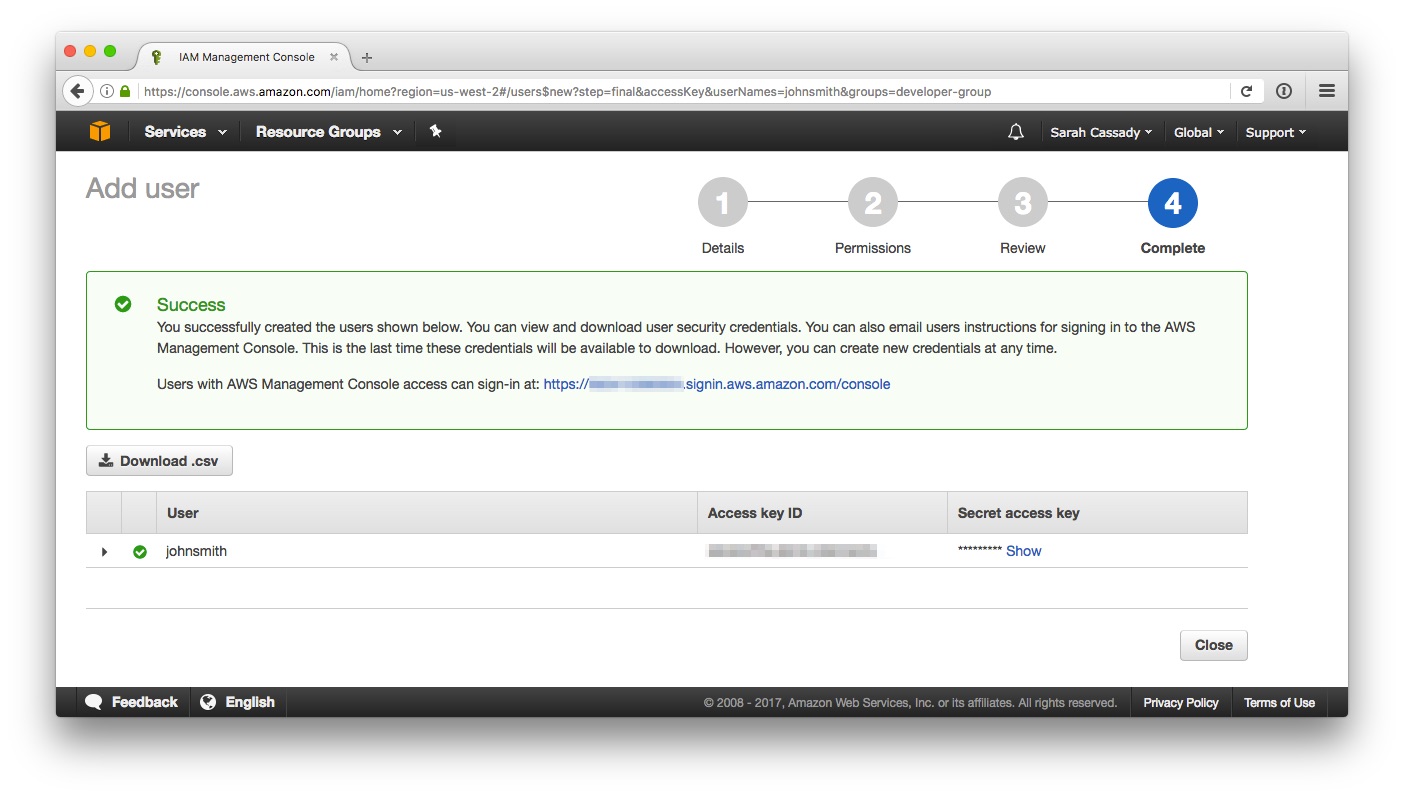
6) Securely share the credentials .csv, the SSH URL for the CodeCommit repository, and the name of the ElasticBeanstalk application and environment to which the WordPress site is deployed, with the new user.
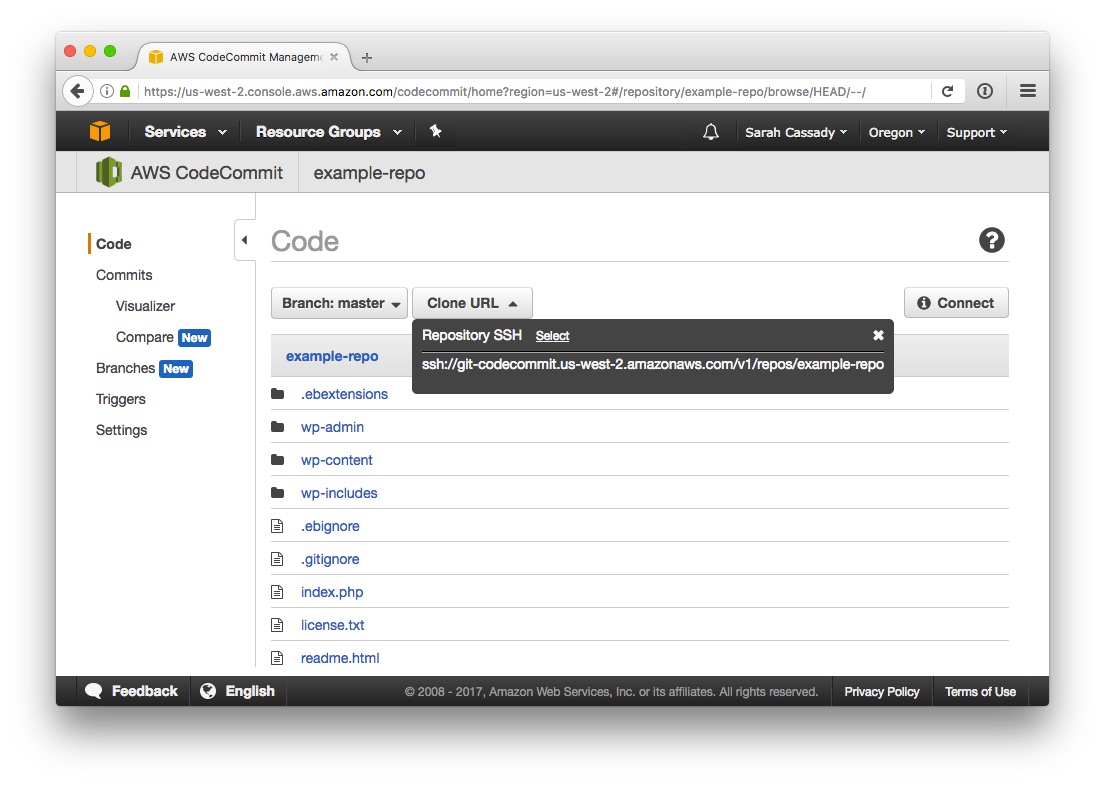
Find the SSH URL by revealing the SSH Clone URL in CodeCommit:
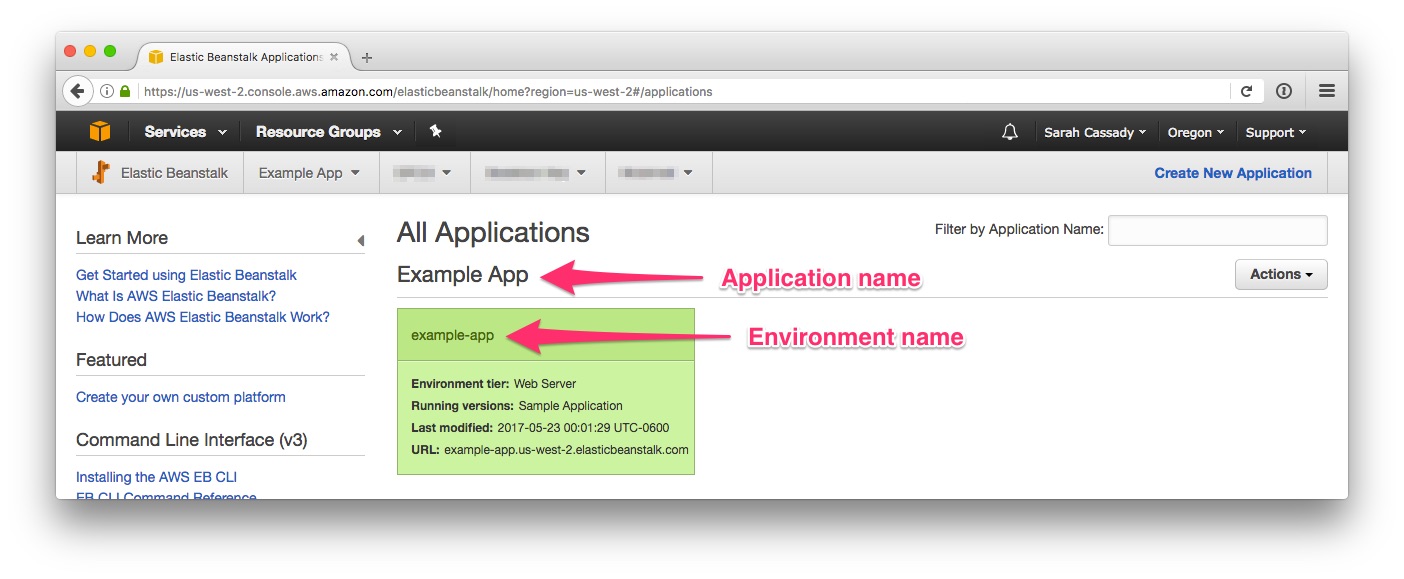
Find the application and environment names in ElasticBeanstalk:
AWS-Virgin Developers: AWS CLI, CodeCommit, and ElasticBeanstalk CLI
Have the following variables ready:
| Variable | Description |
|---|---|
<aws-user-name> |
the user name provided with your AWS credentials |
<aws-access-key-id> |
the access key ID provided with your AWS credentials |
<aws-secret-access-key> |
the secret access key provided with your AWS credentials |
<codecommit-repo-url> |
the SSH URL for the CodeCommit repository |
<codecommit-repo-region> |
the region in the SSH URL host (example: the region for git-codecommit.us-west-2.amazonaws.com is us-west-2) |
<codecommit-repo-name> |
the last segment of the SSH URL (example: the repo name in ssh://git-codecommit.us-west-2.amazonaws.com/v1/repos/example-repo is example-repo) |
<aws-profile-name> |
the name you give your AWS profile client configuration |
<elasticbeanstalk-app> |
the name of the ElasticBeanstalk application containing the WordPress site environment(s) |
<elasticbeanstalk-env> |
the name of the ElasticBeanstalk environment for the WordPress site deployment |
AWS CLI
1) Install the AWS CLI.
2) Configure an AWS profile for your client credentials.
$ aws configure --profile <aws-profile-name>
AWS Access Key ID [None]: <aws-access-key-id>
AWS Secret Access Key [None]: <aws-secret-access-key>
Default region name [None]: <codecommit-repo-region>
Default output format [None]: text
SSH for AWS CodeCommit
1) Generate a 2048-bit SSH-2 RSA key pair and save to your profile’s .ssh directory.
$ ssh-keygen

Generating public/private rsa key pair.
Enter file in which to save the key (/home/UserName/.ssh/id_rsa): ~/.ssh/<aws-profile-name>_rsa

Enter passphrase (empty for no passphrase):
Enter same passphrase again:
2) Configure your profile with your SSH public key.
$ aws iam upload-ssh-public-key --user-name <aws-user-name> --ssh-public-key-body "ssh-rsa MIIBIjANBgkqhkiG9w0BAQEFAAOCAQ8AMIIBCgKCAQEAuhrGNglwb2Zz/Qcz1zV+l12fJOnWmJxC2GMwQOjAX/L7p01o9vcLRoHXxOtcHBx0TmwMo+i85HWMUE7aJtYclVWPMOeepFmDqR1AxFhaIc9jDe88iLA07VK96wY4oNpp8+lICtgCFkuXyunsk4+KhuasN6kOpk7B2w5cUWveooVrhmJprR90FOHQB2Uhe9MkRkFjnbsA/hvZ/Ay0Cflc2CRZm/NG00lbLrV4l/SQnZmP63DJx194T6pI3vAev2+6UMWSwptNmtRZPMNADjmo50KiG2c3uiUIltiQtqdbSBMh9ztL/98AHtn88JG0s8u2uSRTNEHjG55tyuMbLD40QEXAMPLE" --profile <aws-profile-name>The response will look something like:
SSHPUBLICKEY 16:d6:e6:65:b6:76:f6:06:76:e6:36:86:36:66:c6:06
ssh-rsa MIIBIjANBgkqhkiG9w0BAQEFAAOCAQ8AMIIBCgKCAQEAuhrGNglw
b2Zz/Qcz1zV+l12fJOnWmJxC2GMwQOjAXL7p01o9vcLRoHXxOtcHBx0TmwMo
+i85HWMUE7aJtYclVWPMOeepFmDqR1AxFhaIc9jDe88iLA07VK96wY4oNpp8
+lICtgCFkuXyunsk4+KhuasN6kOpk7B2w5cUWveooVrhmJprR90FOHQB2Uhe
9MkRkFjnbsA/hvZ/Ay0Cflc2CRZm/NG00lbLrV4l/SQnZmP63DJx194T6pI3
vAev2+6UMWSwptNmtRZPMNADjmo50KiG2c3uiUIltiQtqdbSBMh9ztL/98AH
tn88JG0s8u2uSRTNEHjG55tyuMbLD40QEXAMPLE
APKAIWM25W3SVEXAMPLE  Active  2017-04-20T22:11:34.814Z  <aws-user-name>
Your SSH key ID in the example would be APKAIWM25W3SVEXAMPLE.
3) Create a file in your ~/.ssh directory. Paste in the following lines, edit the SSH key ID and location of your private key as required, and save and name the file config.
Host git-codecommit.*.amazonaws.com
  User APKAIWM25W3SVEXAMPLE
  IdentityFile ~/.ssh/<aws-profile-name>_rsa
4) Change the permissions for the config file.
$ chmod 600 ~/.ssh/config5) Test your SSH configuration.
$ ssh git-codecommit.<codecommit-repo-region>.amazonaws.comThe response will look something like this:
The authenticity of host 'git-codecommit.<codecommit-repo-region>.amazonaws.com (00.00.000.000)' can't be established.
RSA key fingerprint is SHA256:0pJx9SQpkbPUAHwy58UVIq0IHcyo1fwCpOOuVgcAWPo.
Are you sure you want to continue connecting (yes/no)?
If the RSA fingerprint is SHA256:0pJx9SQpkbPUAHwy58UVIq0IHcyo1fwCpOOuVgcAWPo, then enter yes to add git-codecommit.<codecommit-repo-region>.amazonaws.com to your list of known hosts.
AWS CodeCommit
1) Navigate to your sites/projects folder and clone the repository.
$ git clone <codecommit-repo-url>Then navigate to the cloned repository.
$ cd <codecommit-repo-name>2) Add and verify the URL for the remote repository.
$ git remote add origin <codecommit-repo-url>
$ git remote -v
The response will look like this:
origin <codecommit-repo-url> (fetch)
origin <codecommit-repo-url> (push)
AWS ElasticBeanstalk CLI
1) Install the AWS EB CLI.
2) Navigate to the site directory and initialize a local ElasticBeanstalk environment using your AWS profile.
$ eb init -i --profile <aws-profile-name>Select <codecommit-repo-region> as your default region (unless otherwise specified by the AWS admin).
Select a default region
1) us-east-1 : US East (N. Virginia)
2) us-west-1 : US West (N. California)
3) us-west-2 : US West (Oregon)
4) eu-west-1 : EU (Ireland)
5) eu-central-1 : EU (Frankfurt)
6) ap-southeast-1 : Asia Pacific (Singapore)
7) ap-southeast-2 : Asia Pacific (Sydney)
8) ap-northeast-1 : Asia Pacific (Tokyo)
9) ap-northeast-2 : Asia Pacific (Seoul)
10) sa-east-1 : South America (Sao Paulo)
11) cn-north-1 : China (Beijing)
(default is 3):
Select <elasticbeanstalk-env>.
Select an application to use
1) <elasticbeanstalk-app>
2) [ Create new Application ]
(default is 2):
Enter y to confirm that PHP is the application language.
It appears you are using PHP. Is this correct?
(y/n):
Select PHP 7.0 (unless otherwise specified by the AWS admin).
Select a platform version.
1) PHP 5.4
2) PHP 5.5
3) PHP 5.6
4) PHP 7.0
5) PHP 5.3
(default is 1):
Enter y to configure SSH.
Do you want to set up SSH for your instances?
(y/n):
Select [ Create new KeyPair ] (additional keypairs may be listed, but this option will always be last).
Select a keypair.
1) [ Create new KeyPair ]
(default is 1):
Enter the keypair name using the format aws-eb-<aws-user-name> (a default may or may not be given). The AWS administrator may specify a different format; the format is important because this keypair name will be registered with the client’s IAM and must be unique and recognisable to the administrator.
Type a keypair name.
(Default is aws-eb): aws-eb-johnsmith

Generating public/private rsa key pair.
Enter passphrase (empty for no passphrase):
Enter same passphrase again:
Your identification has been saved in /Users/JohnSmith/.ssh/aws-eb-johnsmith.
Your public key has been saved in /Users/JohnSmith/.ssh/aws-eb-johnsmith.
The key fingerprint is:
SHA256:NdTgAw8KVujIXXtci+3H/yBTF5caxAfaKzvNEXAMPLE aws-eb-johnsmith
The key's randomart image is:
+---[RSA 2048]----+
|    oo. o oE.o.  |
|   ..... *= =. ..|
| . + ..o +*= +.o.|
|  o o . +.+o+ + o|
|       .S. = o. .|
|          o X. . |
|           *o+.  |
|            .o.. |
|               ..|
+----[SHA256]-----+
WARNING: Uploaded SSH public key for "aws-eb-johnsmith" into EC2 for region <codecommit-repo-region>.
3) Test your EB configuration.
$ eb statusThe response should look something like:
Environment details for: <elasticbeanstalk-env>
  Application name: <elasticbeanstalk-app>
  Region: <codecommit-repo-region>
  Deployed Version: app-000000_000000
  Environment ID: e-ssssssssss
  Platform: 64bit Amazon Linux 2016.09 v2.3.2 running PHP 7.0
  Tier: WebServer-Standard
  CNAME: <elasticbeanstalk-env>.<codecommit-repo-region>.elasticbeanstalk.com
  Updated: 2017-04-18 21:20:55.600000+00:00
  Status: Ready
  Health: Green
Deployments can be made as long as the environment status is Ready.
Deployment Workflow
1) Commit all changes to CodeCommit before all deployments.
2) Check that the EB environment status is Ready.
3) Deploy application:
$ eb deployA successful deployment response will look something like this:
INFO: Environment update is starting.
INFO: Deploying new version to instance(s).
INFO: New application version was deployed to running EC2 instances.
INFO: Environment update completed successfully.